This PCSX2 setup tutorial for the PCSX2 emulator outlines everything you need to know about how to download, install and use PCSX2. I am using the Windows PC version in this guide, but you still may find it useful if you are using the Mac or Linux versions too.
PCSX2 Setup Tutorial Summary
PCSX2 Download & Setup Process
Where to Download PCSX2
- To download PCSX2, visit the official PCSX2 website. On the homepage, locate and click the Latest Stable version.
- Select the appropriate download for your system. The installer version is recommended as it gives you the options to choose between a fully installed version or portable version, keeping all necessary files in one convenient place.

Installation Process
- Run the downloaded PCSX2 installer file.
- Follow the prompts and choose Portable Installation to keep all files organized in one folder (This is my personal preference as it makes managing files for PCSX much easier).

- Choose the location you wish to install PCSX2 for installation to your own preference.
- Create a Desktop Shortcut for easy access if required.
- Once installed, you can click Finish and let PCSX2 launch.
Language and Theme Selection
- Upon first launch, select your preferred language (default is English).
- Choose a theme for the emulator interface (e.g., Dark Fusion Gray).
- Allow PCSX2 to check for updates regularly for the latest improvements.

PCSX2 BIOS Configuration
You will need a PS2 BIOS file in order to play PS2 games with PCSX2. To ‘legally’ obtain a PS2 BIOS file, you need to dump the BIOS file from a PS2 that you own, but if you are not in a position to do that, then you will have to source them yourself.
Once you have your PS2 BIOS files, you will need to do the following:
- Select the folder where the BIOS files are stored. BIOS files are essential for PS2 emulation.
- Place the BIOS file into the PCSX2 > BIOS folder.
- Once added, click Refresh List to load the BIOS list.
- Next click and highlight the BIOS you wish to use with PCSX2, then click Next.

PCSX2 Game Folders
- Create a new folder wherever you wish to store your PS2 game files.
- In PCSX2, click the Add Folder button and select the PS2 game file folder that you have created.
- Set PCSX2 to automatically scan this folder for new games each time the emulator starts by checking the Scan Recursively checkbox.

PCSX2 Controller Configuration
- Connect your controller to your system and ensure the Controller Type for Port 1 in PCSX2 is set to DualShock 2.
- Select Automatic Mapping to and select your connected controller to assign the controller buttons automatically.

- If using a second controller, repeat the process for Controller Port 2.
- Click the Next button to complete the controller setup process.
Setup Complete
You have now completed the PCSX setup process!

Booting PS2 Games in PCSX2
If you are using a PS2 ISO, once the game is in the game directory you specified earlier, it should appear in the window when you launch PCSX2.
Tip
PCSX2 is compatible with a range of file types (pictured below), you will typically find that .bin/.cue and .chd files types are the most common, but anything other than what is listed below, will not work in PCSX2.
Make sure that any ISO files that are archives such as .rar, .zip or .7z are extracted in to your games folder, as PCSX2 will not be able to read this from within the archive. PCSX2 will work with .chd files, which is a specially designed compressed file type that PCSX2 has been designed to be able to launch.

- To start playing a game already in your library, simply double-click the game you wish to play in your game list, and the emulator will load it.
- If you want to load an ISO file stored outside of your PCSX2 game library, use the menu option System > Start File, then select the game file you wish to load.
- PCSX2 also allows you to boot from actual PS2 game discs. To do this, you will need a DVD-ROM drive for your computer. Simply put the disc in to your DVD-ROM drive, then select the menu option System > Start Disc. PCSX2 will then boot the game directly from the disc.

Your game will boot in the PCSX2 window, like below!
If you want to play in Fullscreen mode, simply go to View > Fullscreen in the menu, or press Alt + Return to go in to Fullscreen mode. To go back to Windowed mode, press Alt + Return again.

PCSX2 Graphics – Getting Games Looking Better
There are a large amount of video settings in PCSX2, many of which you’ll probably not have much of an idea what they do! This section of the tutorial looks to provide additional insight in to PCSX2 graphics settings and what can be done to make your PS2 games look better.
Enable Performance Monitoring
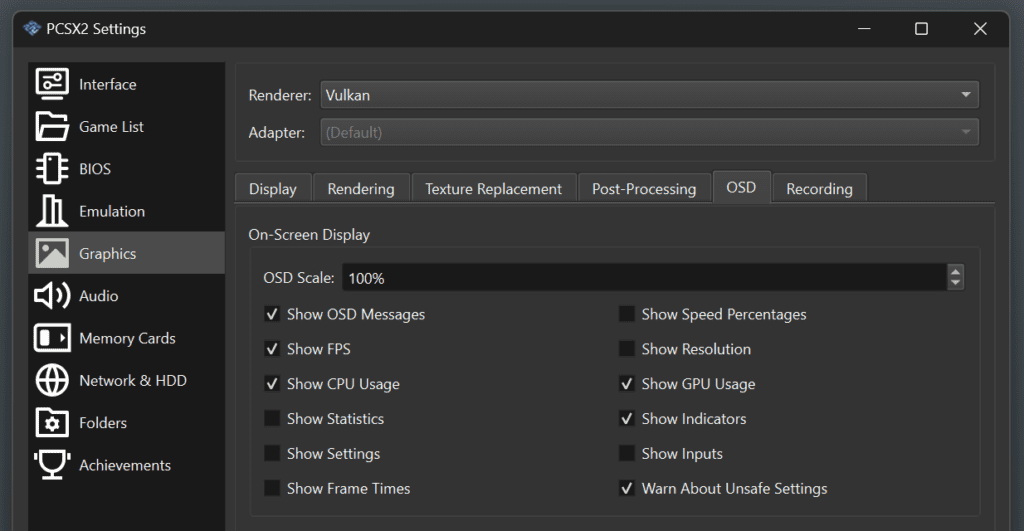
Whilst you are going to be experimenting with the PCSX2 setup and graphics settings, I recommend enabling some of the performance monitoring tools, as it will be helpful to monitor system performance as you tweak settings.
To enable key performance monitoring features, go to the menu and select Settings > Graphics, then go to the OSD tab.
- Enable the following:
- Show FPS: This shows how many frames per second (FPS) your game is running at.
- Show CPU and Show GPU usage: This displays the load on your system, allowing you to adjust settings that balance performance with quality.
Keeping an eye on these stats helps you ensure your system isn’t overtaxed whilst testing different graphics features.
Choosing the Right Renderer
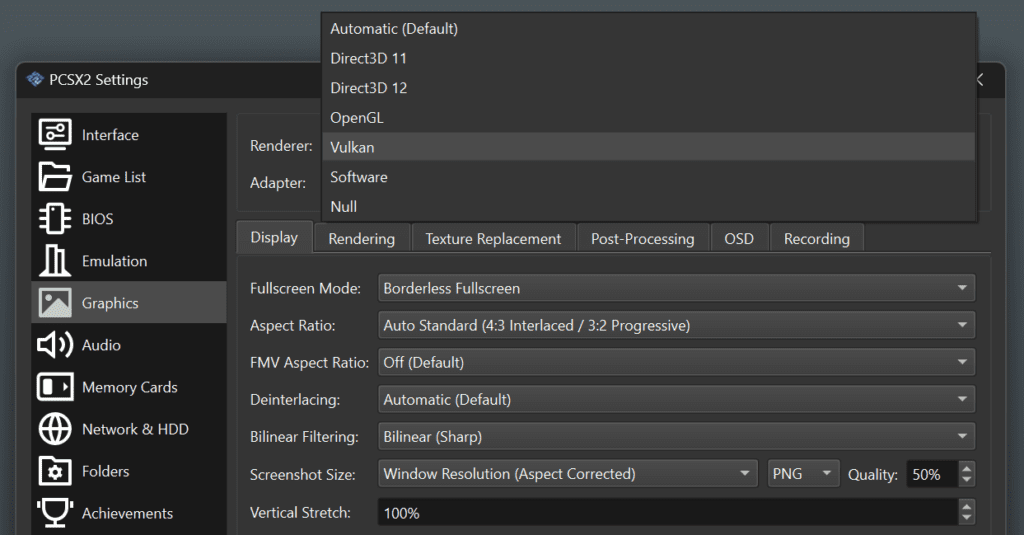
PCSX2 offers multiple rendering methods, but each has its strengths and weaknesses depending on the game. If you go to Settings > Graphics, you will see the ‘Renderer’ drop down menu.
Here’s a breakdown of the renderers available in PCSX2:
- Direct3D 11/12: These are fallback options when Vulkan and OpenGL don’t work. They tend to be less effective in terms of visual quality, particularly when it comes to blending effects, which can appear less accurate.
- OpenGL: A balance between performance and compatibility, OpenGL tends to work with most games and still offers good performance.
- Vulkan: This is the fastest option in terms of performance, often providing the best frame rates. However, it has limited compatibility with some games, so if your game doesn’t work correctly, try switching to another renderer.
- Software: Uses the CPU for rendering and delivers the best accuracy, but lacks the graphical features the other renderers offer.
- Null: Used for debugging purposes. If you’re just playing games, you can ignore this option.
Tip
Rather than just relying on the default ‘Automatic’ setting, try to set the renderer manually to either Vulkan or OpenGL depending on what performs best with each game. This ensures consistency and makes troubleshooting easier if something goes wrong.
Configuring Display Settings
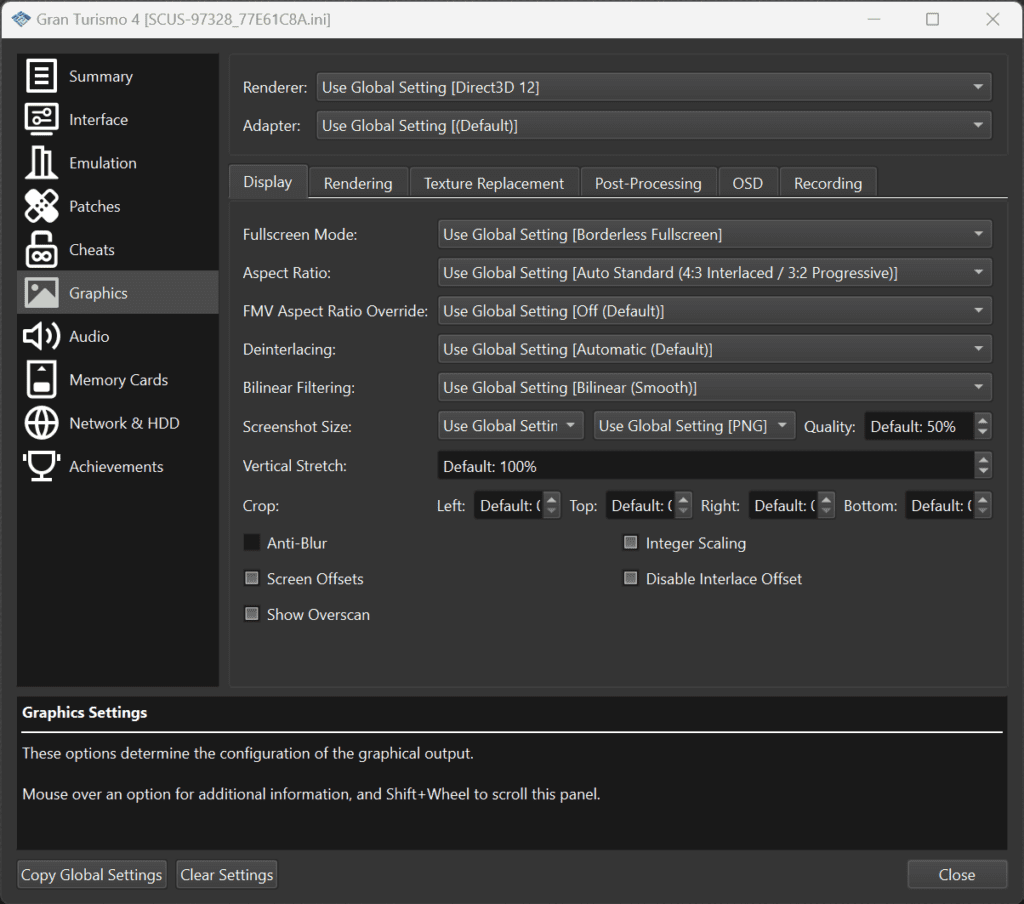
Now it’s time to adjust to get your games looking as good as possible, these settings can be found via the Settings > Graphics menu and select the ‘Display’ tab.
Full-Screen and Aspect Ratio
- Fullscreen Mode: Use Borderless Fullscreen for smooth transitions when switching between windows or minimizing.
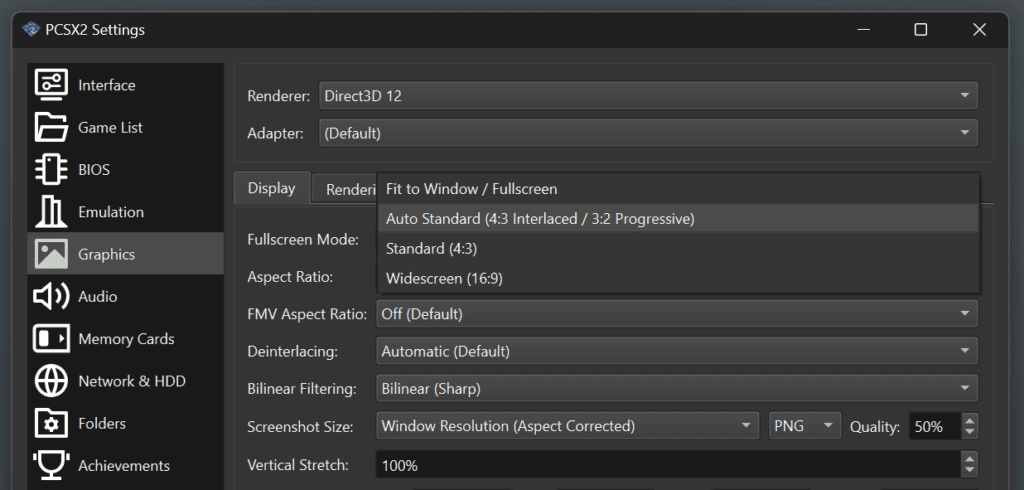
- Aspect Ratio: Most PS2 games are designed for a 4:3 display, but some support 16:9 widescreen:
- Fit to Window / Fullscreen: This options means the screen will stretch based on the size of the PCSX2 window or stretch based on the Fullscreen dimensions.
- Auto (4:3): This is the best setting for games not designed for widescreen, as it preserves the original look.
- Widescreen (16:9): Select this if you want to force widescreen mode, but be aware that some games might look stretched.
- Enable Widescreen Patches: This option applies widescreen patches to games that don’t natively support widescreen, adjusting the aspect ratio without stretching the image unnaturally.
Tip
I recommend sticking with Auto (4:3) for most games. Unless you have a game that specifically caters for 16:9 mode, or you are using widescreen patches, Auto (4:3) is the most commonly used setting.
FMV (Full-Motion Video) Settings
Some games have cutscenes (FMVs) that don’t handle widescreen well:
For most cases, setting FMV Aspect Ratio to 4:3 to avoid stretched or distorted cutscenes is best. Some games will stretch the FMVs to fit the screen, and this setting prevents that.
Deinterlacing – Enhancing Image Quality
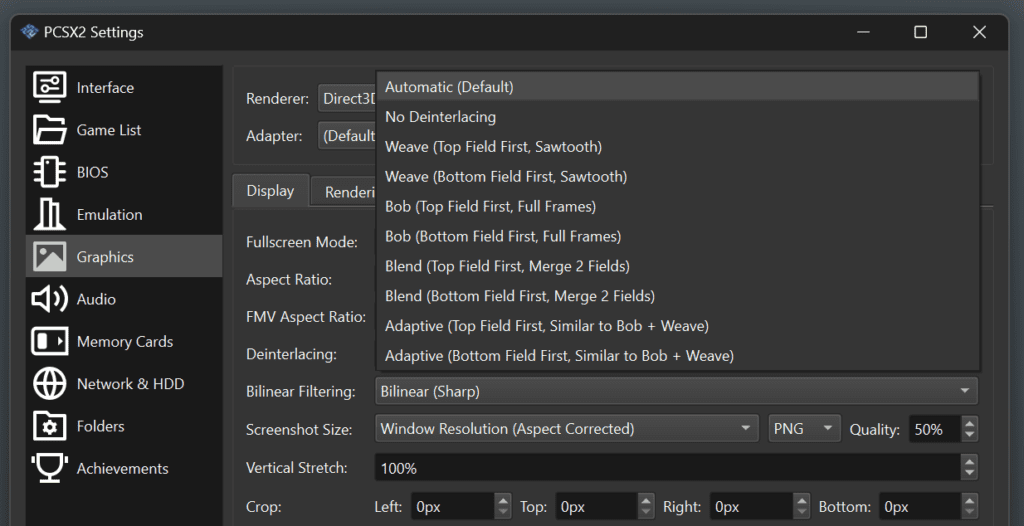
Deinterlacing is crucial for improving how PS2 games look on modern displays. Since many PS2 games were designed for old CRT screens, their images may appear jagged or flicker on todays displays. These settings can be found in the Settings > Graphics menu, then select the display tab.
- Native Progressive Scan: Some games come with a built-in Progressive Scan Mode that you can activate in the in-game options menu. PCSX2 will automatically detect this and disable any unnecessary deinterlacing options.
- No Interlacing Patches: PCSX2 offers patches that simulate progressive scan in games that don’t support it natively. These patches remove the flickering caused by interlacing without you needing to manually adjust settings.
- Deinterlacing Options: If a game doesn’t support progressive scan and there is no patch, use the Deinterlacing setting. Leave this on Automatic (Default) setting, as PCSX2 typically chooses the best option for each game. If you want to manually test different methods, press F5 while playing to cycle through available deinterlacing modes until you find the one that works best.
Anti Blur
Checking Anti Blur in the Display tab enables the anti blue hacks in PCSX2, which removes that classic PS2 blurriness. Whilst some prefer that more authentic look, it helps achieve a much more sharp and pixelated appearance if that’s your thing.


Enhancing Graphics with Rendering Settings
This focuses on improving the quality of in-game textures, reducing jagged edges, and overall making the game look sharper and more modern. These settings can be found in the Settings > Graphics menu, then under the ‘Rendering’ tab.
Internal Resolution
The Internal Resolution controls how sharp the in-game textures are. Increasing the internal resolution can make the game look HD, but it requires more processing power.
- 3x Native upscales to 1080p, it is a good middle ground for most systems.
- 6x Native upscales to 4k. This setting or higher will make the game look significantly sharper but may cause performance drops on basic systems.
You can see from the screengrabs below the difference between native PS2 resolution vs. 3x Native (1080p), the 3x setting drastically improves the appearance, especially with jagged edges if the anti blur feature is also activated.


Texture Filtering
Bilinear Filtering smooths out textures and reduces pixelation.
- Bilinear (PS2) ensures the game uses the same filtering settings the original console would have applied.
- You can force bilinear filtering on all games by choosing Force Bilinear. This can help enhance the look but may not work well for every game.
Anisotropic Filtering
Anisotropic Filtering reduces the jagged appearance of textures at sharp angles, making them appear smoother. You can set this from 1x to 16x. Higher values offer better visuals but demand more from your system.
Anti-Aliasing
FXAA (Fast Approximate Anti-Aliasing) smooths out jagged edges in games. This option can improve the overall image quality, but it may blur the image slightly. Experiment with it to see how it affects your game.
Dithering
Dithering is a technique that helps blend colours in PS2 games but can look a bit out of place on modern displays or higher resolutions when using PCSX2, so you have the ability to turn it off, which can help remove an odd texture like appearance to some games.
By default, it’s normally best to set to scaled, so it scales with any upscaling applied, but if you do have odd appearance issues as detailed above, try switching it off and see if it helps.

Post-Processing Effects
PCSX2 offers several post-processing options to further tweak and enhance the game’s visuals. These can be found under the Settings > Graphics menu and ‘Post-Processing’ tab.
Contrast Adaptive Sharpening (CAS)
- Contrast Adaptive Sharpening is a sharpening filter that helps enhance the clarity of the game. You can:
- Sharpen the Internal Resolution only, or
- Sharpen and resize based on the Display Resolution.
- Adjust the sharpness level depending on how clear or sharp you want the game to look. This is useful for games that appear too soft after upscaling.
Shaders
Shaders are effects used to mimic the look of older display technologies like CRTs. If you prefer a more authentic, retro feel, you can experiment with different shaders. Otherwise, you can skip this if you want the cleanest possible image.
Tip
The only shader I tend to use occasionally is the Scanline Filter, this produces a relatively good looking CRT scanline effect. The only thing is, you will find the brightness suffers somewhat when it is applied, so experiment with the Shade Boost option and tweak the brightness, contract and saturation settings to your liking.

Saving Settings for Each Game
Every PS2 game has different requirements. Some games may run perfectly with high settings, while others may require lower settings to avoid performance issues. PCSX2 allows you to save configurations on a per-game basis to handle these differences.
- Load the game you want to configure.
- Once in the game, press Esc to return to the PCSX2 menu and go to Settings > Game Properties.
- In this window, you’ll see the same graphics and rendering settings as the main configuration menu. Any changes you make here will apply only to this specific game.
- For example, if a game struggles to run at a higher resolution, you can lower the Internal Resolution for that game alone without affecting others.
- Saving and Applying: Make sure to click Apply after making changes, and the settings will be saved for future playthroughs of that game.
Game Saves with Memory Cards
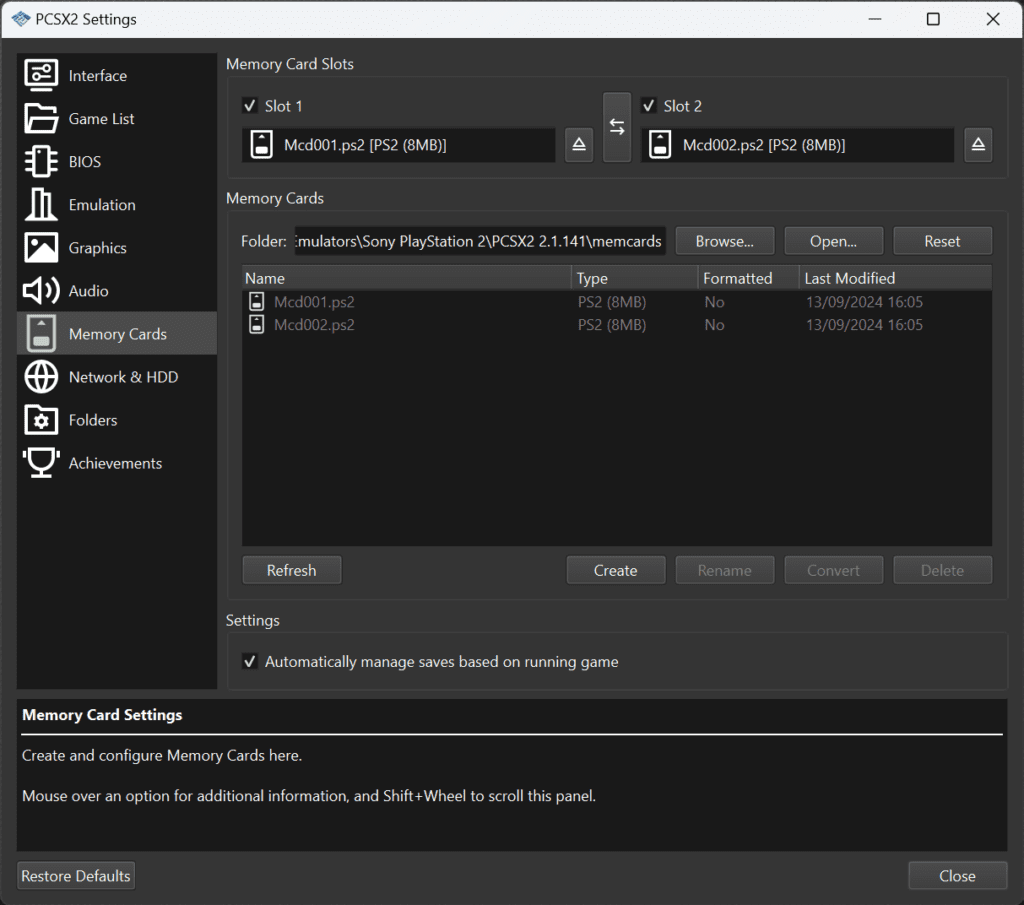
Memory Card management can be accessed via Settings > Memory Cards. Her e you can manage your virtual memory cards in PCSX2.
When PS2 games prompt you to save on to a memory card, PCSX2 will automatically create a memory card file. If you want to create your own PS2 memory card, simply click the Create button and give your memory card a name, choose the size of the memory card and click Ok.
You can then right-click on the memory card you have created in the list, then specify whether you want it to be inserted in memory card slot 1 or 2.
PCSX2 Save States
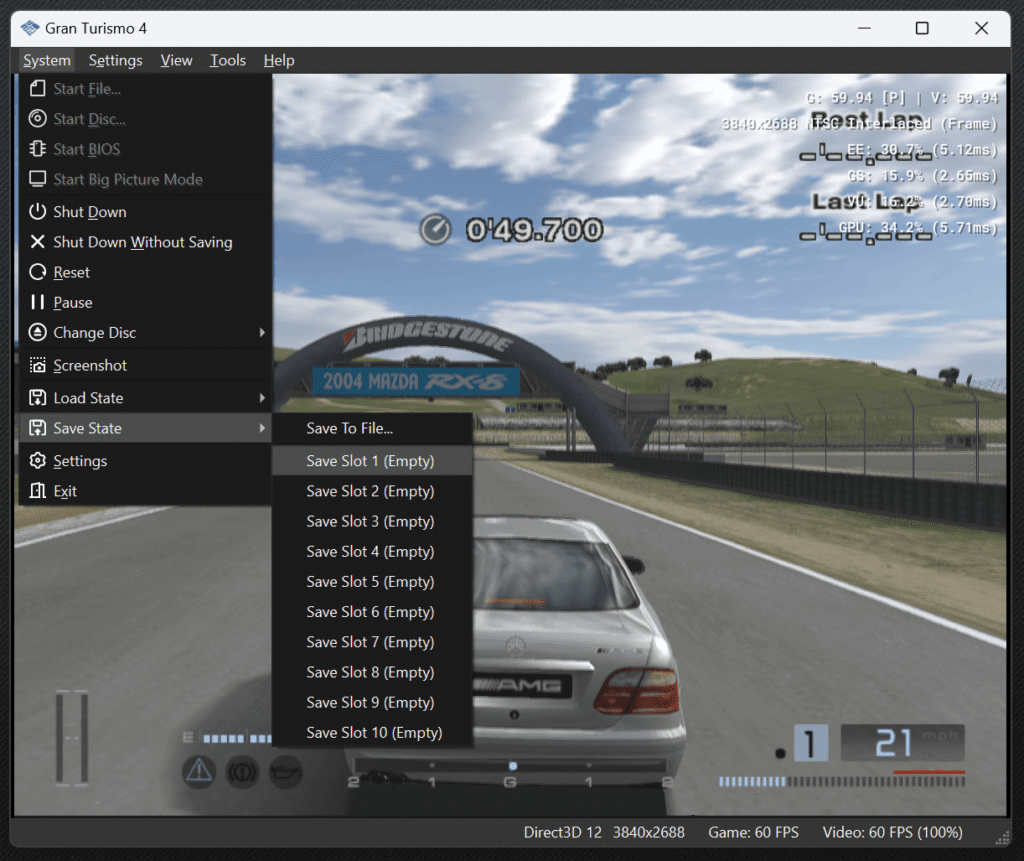
Save states are different to using the memory card for saving games. Save states are not part of the PS2 functionality, they are specific to the emulator, PCSX2. The advantage of save states are that they will take a snapshot of exactly where you have made the save, so you can recall it and pick up where you left off.
Here’s how to save and load states in PCSX2:
- Saving States: Access the System > Save State menu, then select a save slot.
- Loading States: Access the System > Load State menu, then select the slot you wish to load.
Additional Resources for PCSX2
PCSX2 Wiki
If you’re having trouble with specific games (e.g., visual glitches, crashes), check the PCSX2 Wiki. It contains user-submitted information on how to fix common issues with many PS2 games with PCSX2.